[Some products are press samples.]
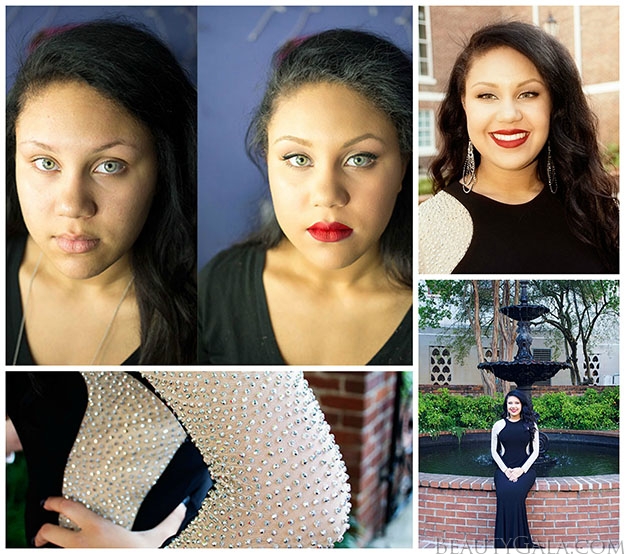
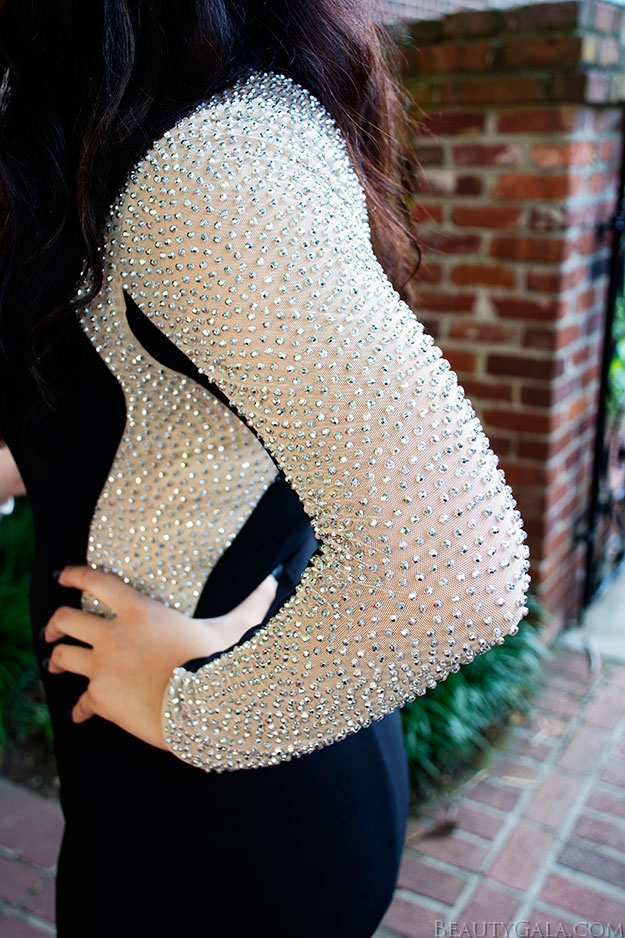
This weekend was Senior Prom, and I had the pleasure of doing gorgeous, sophisticated airbrush makeup on a young lady who wanted a very classically beautiful makeup look. Her dress was long sleeved with a long, flowing black skirt, and silver beading on the arms and in the waist area. Her gown was incredibly classy and our first and only thought was that we had to go with classic, vintage-inspired makeup. I’m going to show you before and after, a full product breakdown, and why I used what I did.
ESTABLISHING YOUR CLIENT’S NEEDS: One of the most important things about doing makeup on someone is listening to them. I don’t believe in pushing my specific style of makeup artistry on anyone unless they tell me to just do whatever I think looks best. It’s important when doing event makeup that you take into consideration what the person is wearing and the general mood of the event. Since her gown was extremely elegant and classy, we both wanted the makeup to feel timeless and classic in its own right. She had the idea of red lips and from there, we decided on winged eyeliner and corner false lashes with minimal eye makeup otherwise. I also suggested we do a matte red lip, since matte is trendy, but also a look that was worn by all the vintage bombshells and movie stars.
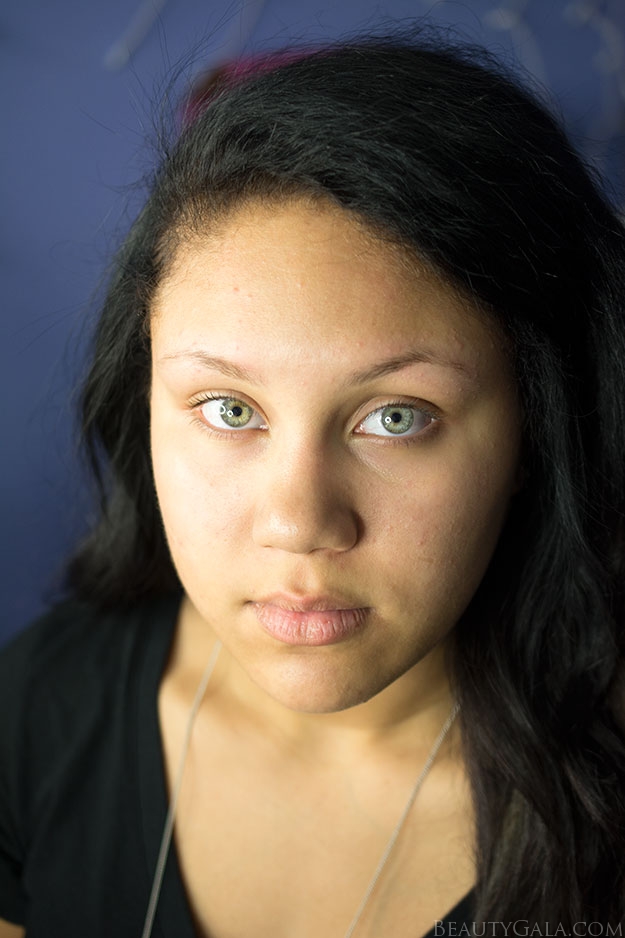
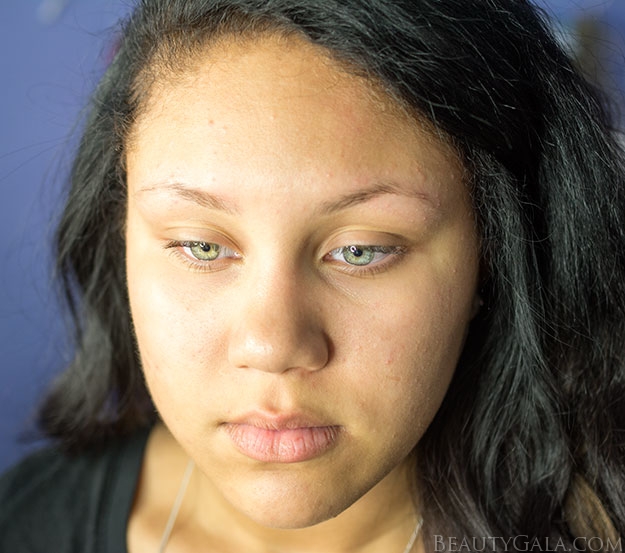
BEFORE:
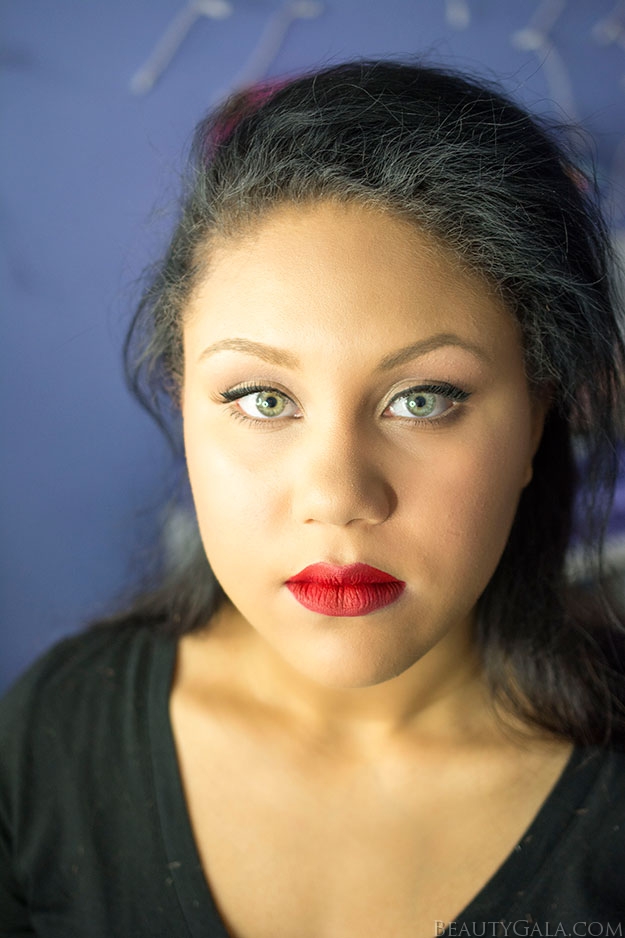
AFTER:
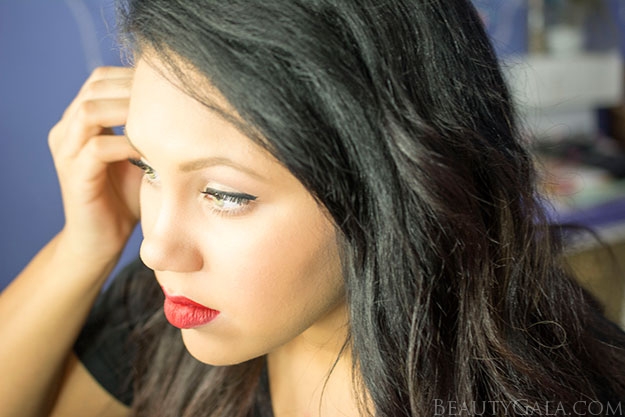
BEFORE:
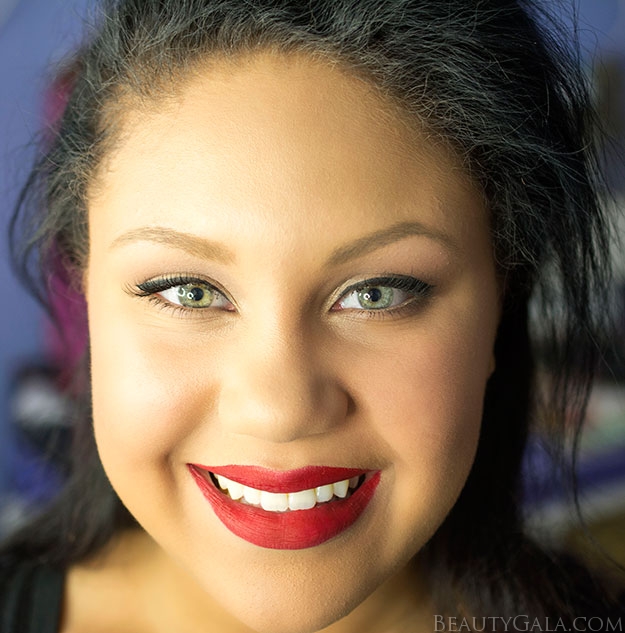
AFTER:

PRODUCT BREAKDOWN (in order used):
- MAKE UP FOR EVER Step 1 Smoothing Primer: I swear by this face primer because it is a miracle worker. I had her use her own clean hands to apply this primer generously to her forehead, cheeks, chin, and nose. She applied extra around her nose where she feels she has blackheads and uneven texture to her skin. This primer completely took away those problems and helped the face makeup to apply like a dream.
- Temptu Airbrush System: This is my favorite airbrush system to use when I am airbrushing skin. They have pods you can use for pretty much every single part of the face, but for this particular look, I used it for her foundation and for her blush only. The fine mist allows you to build coverage slowly and the product never looks caked on or too heavy. It covers your imperfections seamlessly and really gives you that “Hollywood Red Carpet” complexion.
- Temptu AirPod Foundation in 006 – Warm Beige: This is the actual pod that you pop into the Temptu Airbrush System for foundation. I used shade “006 – Warm Beige” all over her face, neck, and slightly onto her ears so that everything blended seamlessly. Since she is young, her skin really didn’t need a lot of makeup or correcting besides some uneven tone and a few small pimples. Since this is event makeup that has to last all night and photography is huge at prom, I did 2 layers of foundation, making sure the first layer was completely dry before I moved onto the next. The important thing with airbrushing is that you always keep your system on lower than you think you need to and consistently keep your airbrush moving around at about a forearm’s length away from the face.
- MAC Pro Longwear Concealer in NC20: To get rid of any under-eye circles, as well as to highlight the area underneath the eyes, down the center of the nose, forehead, and chin, I used this concealer because it is so long-wearing. I used my ring finger to dot it on and then blended it out with a damp Beauty Blender. I pretty much used my Beauty Blender throughout this entire makeup application constantly and could not have done the job without it. I highly recommend owning one. Make sure you wet yours until it is saturated in water and grows to double the size. Squeeze out the excess water so that it is damp and you are ready to use it. Beauty Blender’s are meant to be used damp!
- Kat Von D Shade + Light Contour Palette: I use this palette on a daily basis and it can be used on any skin tone. I used the banana shade in the palette to set the area underneath her eyes, all around her nose, her forehead, and her chin area. I also dabbed some onto her eyelids to even them out and set them so that they didn’t crease later. She wanted completely matte skin besides highlighter on her cheekbones, so I made sure to powder her skin well so that everything stayed matte and in place. I used the darkest contour shade in the palette to lightly sculpt out her cheekbones and underneath her jaw line. She didn’t want a dramatic contour, so I kept the darkest part of the contour close to her ears and blended it out very well in upward strokes. It gave her a subtle shadow and supermodel-like bone structure. To make my subtle contour stand out more, I applied the banana shade underneath the contour on the cheeks, to crease contrast. This is a good trick for making your contour stand out more without having to use a ton of product. You never want super dark, dramatic lines running down the side of your cheekbones as your contour!
- Temptu AirPod Blush in Peony Pink: I went back with my Temptu Airbrush System at this point and airbrushed this soft pink blush onto her cheeks. I made sure not to overdo it because it’s really easy to overdose on blush, whether you’re airbrushing or not. I used my damp Beauty Blender to blend out any excess product since we only wanted a light flush to her cheeks.
- BECCA Shimmering Skin Perfector Pressed in Opal: Those who know me know that I cannot go without using this as a highlighter on myself or anyone else. It is my all-time favorite and it looks great on everyone. I used a fan brush to blend this onto the tops of her cheekbones, lightly down the center of her nose, and above the Cupid’s Bow of her lips. Since she wanted matte skin, I made sure to use a light hand and use this on her cheekbones for that glow when she turned her head.
- L’oreal Infallible Makeup Setting Spray: I went in with setting spray at this point because I had finished all of her skin makeup. I went in several times with this spray throughout the process. It’s a wonderful spray to use for big events because it will help your makeup stay put for hours and hours. While the setting spray was still slightly damp on her face, I patted my Beauty Blender onto her skin so that everything looked well blended and seamless.
- Urban Decay Eye Primer in Eden: This eye makeup primer is matte and evens out the color of the eyelids. I used this so that everything on the eyes would stay put and not crease throughout the night.
- LORAC Mega Pro Palette: This palette is no longer available, but you can use any eye makeup palette that has matte, neutral shades in it. I used the shade “Khaki,” a light matte grey into the sockets of her eyes and blended it out well. I also applied “Khaki” lightly along her lower lash-line. I applied a light satin beige over her entire eyelid. I also applied a matte flesh-toned shade underneath her brows. Make sure everything is blended extremely well and use your fluffy blending brush to keep everything looking subtle. She didn’t want her eyeshadow to look noticeable per se, but liked the definition the socket color gave her eyes.
- Tarteist Clay Eyeliner: This is another favorite of mine and a product that will not budge for many hours. To do the winged eyeliner, start with a thin line all across the upper lashes and then wing your liner out into a cat-eye with wings that angle upward. If you’re shaky with eyeliner and winging it out, use small, short strokes and keep checking the lines in the mirror before filling them in.
- MAC Chromagraphic Pencil in NC15/NW20: This is a fabulous liner for your water-line area. It opens up the eyes, makes them look awake and bright, and really adds something special to the eye makeup. As soon as we did this step, she even said, “My eyes look so much bigger.” It’s definitely a step worth doing if you want to give the illusion of larger eyes.
- Ardell False Eyelashes in 110: These are extremely natural looking eyelashes. We were going to use the entire eyelash until we both had the idea of cutting them in half and applying them only to the outer corners. This really complements a cat-eye because your eyes will look super almond-shaped. It’s also low maintenance, since you don’t have to worry about your lashes coming off around the inner corners of the eyes. We also curled her lashes and applied mascara to blend the lashes in on top and give her lower lashes definition.
- Anastasia Dip Brow in Blonde: Though she has extremely dark, almost black hair, this color was perfect for her. She wanted definition to her brows but nothing too crazy. I used a slanted eyeliner brush to apply this in light, long strokes. Since her brows are already beautifully shaped and she had them waxed before prom, all I did was darken them up slightly and fill in the tail-end of them where she lacked hair. Brows can really make or break a face, so when working on them, you want to go with their natural shape, not making them too thick or too thin. It’s also important to keep them 2 shades lighter if they have dark hair, or 2 shades darker if they have light hair, if you are going for a natural look. This is another great product that won’t budge, even if you rub it!
- MAKE UP FOR EVER Lip Line Perfector: I used this around her lip line so that her lip color wouldn’t feather or bleed onto her skin. When working with really dramatic lip colors, especially bright reds, this is a must. The pencil is actually clear and colorless, but it prevents your lip products from straying.
- Jeffree Star Cosmetics Velour Liquid Lipstick in Redrum: This was the star of her lips! This is a liquid lipstick that dries down to a long-lasting matte finish. Nothing will take this off until you use an oil-based makeup remover (or eat something oily).
- MAC Media & RiRi Woo Lipsticks: We went back with two different tones of red lipstick, one dark red and one that matched “Redrum.” We used the darker one on the outer corners of the lips for a slight ombre effect and then applied the bright red lipstick to the middle of the lips to keep them looking hydrated (matte liquid lipstick can make the lips look too dry in pictures). When wearing really dramatic lip colors, especially reds, you want to make sure the lip line is as crisp as possible. To get hers looking perfect and crisp, I went back in with concealer and a small brush and traced around any area’s that were outside of her lip line. Then I set the concealer with powder so it wouldn’t budge. This step takes an extra few minutes but it is crucial when wearing red lipstick for events, especially if you know your photograph will be taken a lot.
Once again, I finished her entire face off with the L’oreal Infallible Makeup Setting Spray and used my Beauty Blender to dab her face in various places where I wanted to blend even more. I tend to be a perfectionist and when I know someone is being photographed a lot, I want their makeup to look flawless on camera. Let’s take a look!
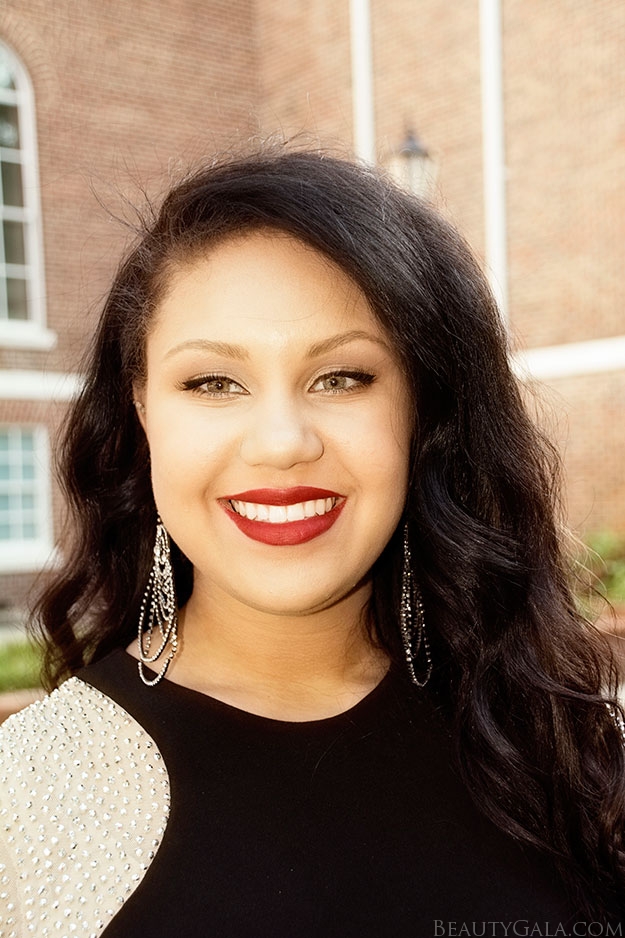
THE FINISHED PROM MAKEUP LOOK:
SIDE-BY-SIDE BEFORE AND AFTER COMPARISONS:

Before/After Prom Makeup
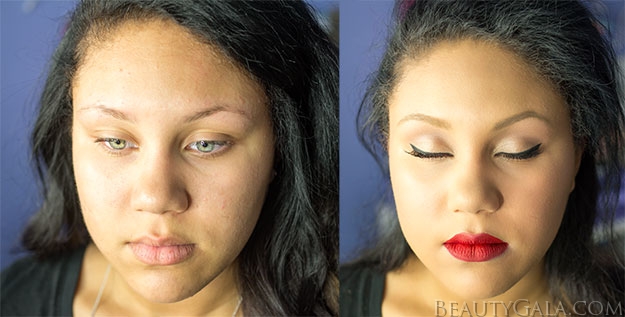
Before/After Prom Makeup
I love that she still looks like “herself,” just an enhanced version. When working with teenagers and younger people especially, I really aim to keep them looking like “themselves” but with a glamorous sprinkle of makeup magic!
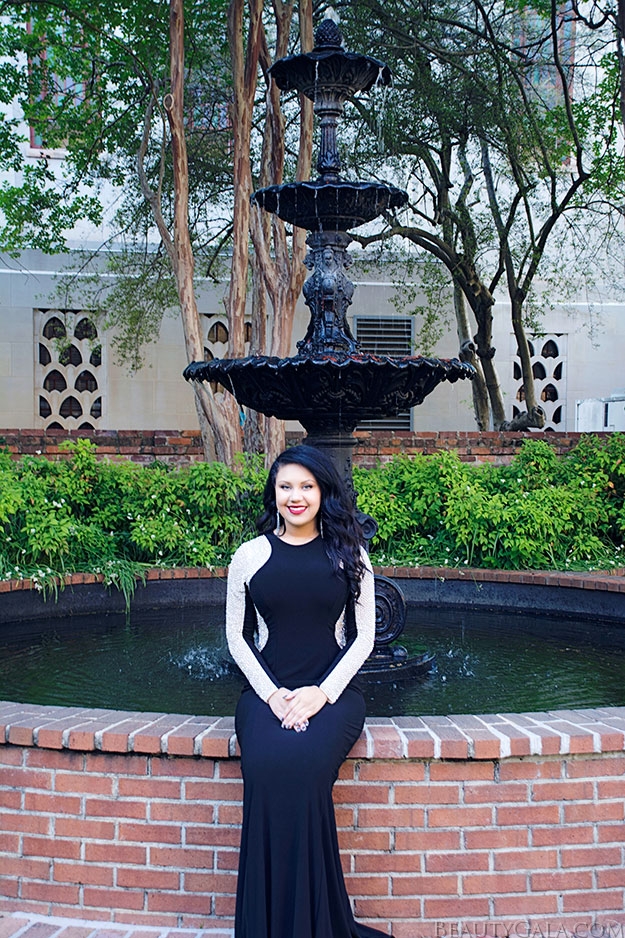
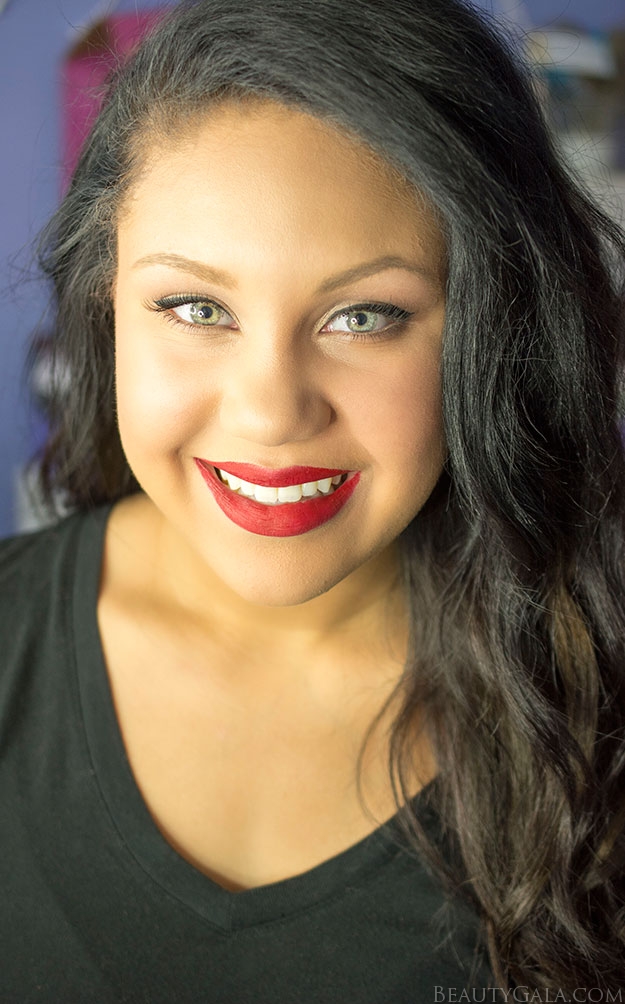
The finished prom look all tied together
Total time: Approximately 1 hour and 15 minutes.

I hope this helped if you have prom coming up still and you’re interested in a similar look or you just need tips and tricks. It’s all about using long-lasting, infallible makeup products that will stay put through hours of photographs, dinner, dancing, and fun.
If you are in the Columbia, South Carolina region and are interested in a makeup session for prom, a special event, or even a makeup lesson, please e-mail me: Rebecca@beautygala.com for rates. I very rarely freelance anymore due to lack of time, but I do have some room for openings until July 2015.
As always, if you have any questions about the techniques or products used, leave them in the comments below or on social media for me: Twitter, Facebook, Instagram, Pinterest.
[ALL PHOTOGRAPHY ON THIS SITE IS TAKEN BY REBECCA KAZIMIR. NO PHOTOGRAPHS ARE TO BE REPRODUCED WITHOUT WRITTEN PERMISSION.]
Wow! I rarely comment on blogs these days (too many blogs, not enough time) but after reading this in my Feedly I just HAD to come here to tell you what a marvelous job you did! She is a beautiful young girl and your makeup just made her look so flawless. And you’re right, she still looks like herself which I love, and even more importantly, it doesn’t look heavy or overdone. Wonderful work!
Thank you SO much Yemi!