
One of the most requested and popular looks among women is a natural but glamorous makeup look. A sexy look that doesn’t appear too heavy or dramatic, yet still plays up your features. This is a look that is perfect for a date, a night out on the town, or a special event. When I received the request for this look from Mandy Buchanan on Twitter, I automatically thought of the queen of the natural-glam makeup look: Angelina Jolie. To see a photograph of the inspired look, and a step by step photo tutorial of how to achieve this look,

Angelina Jolie inspired
The natural glam look can be achieved with many different brands and variations of the products I am using, and are solely recommendations. Oh, and before we get started on the tutorial, I need to note that it took a lot of courage to place photographs of myself in comparison to Ms. Angelina Jolie herself!
Step 1: Moisturize and use a face primer to conceal pores and create a smooth, even surface for your makeup to apply to. I love L’Oreal Studio Secrets Face Primer.
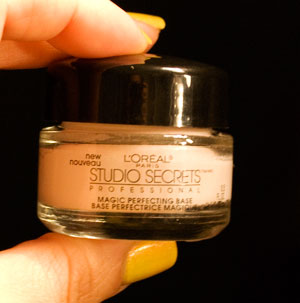
L'oreal Studio Secrets Magic Perfecting Base
Step 2: Apply your foundation to your face. I used Revlon PhotoReady Makeup – Nude and applied it with a damp Beauty Blender Beautyblender, 0.05
sponge to achieve a very natural, soft glow all over.

Revlon PhotoReady foundation in 004 Nude

Using my BeautyBlender to apply my foundation
Step 3: Set your foundation with a loose powder for long lasting wear. I personally used Eyes Lips Face Complexion Perfection, which is a cheap way to correct any redness, imperfections, and set your foundation in one.

E.l.f Complexion Perfection

Sweeping E.l.f Complexion Perfection
Step 4: Contour and highlight your cheekbones to create a sculpted look. A full how-to contour video is coming this week on Beauty Gala. Contouring your cheekbones will make your face look thinner and sleeker, while achieving a more natural look than blush. Simply suck in your cheeks (make that fishy face), and lightly apply a matte powder or liquid to the hollows of your cheeks sweeping upward on an angle. Be sure to blend extremely well. In the meantime, I have included a diagram of where to highlight, and where to contour your face. To do this, I used the Coastal Scents Contour & Blush palette.

Coastal Scents Contour & Blush Palette

Applying my contour with my fishy face!

Contour & highlight map

My finished cheek contour

Highlight shade from Coastal Scents palette
Step 5: Apply your favorite eyeshadow base, to increase the lasting power of your eyeshadow. Then, sweep a beige eyeshadow with a light shimmer to it over your entire eyelid, up to your brow bone. For my entire eyeshadow look, I used the Coastal Scents 88 Warm Palette.

Coastal Scents 88 Warm Palette, colors used are circled

Sweep a brush into your beige eyeshadow

Washing the lid with beige
Step 6: Apply a matte, chocolate brown eyeshadow into the crease of your eye, extending slightly upward and blending out into the outer corner of your eye.

Chocolate brown crease color

Applying & blending my crease color

After blending my crease color
Step 7: Sweep the same chocolate brown eyeshadow that you used for your crease lightly onto your lower lash line. Only apply about two-thirds towards your inner eye. This creates a soft “eyeliner” look without actually using dramatic eyeliner.

Lining the bottom with eyeshadow

Light, lower lash line effect
Step 8: Apply a black liquid, gel, or pencil liner to your upper eyelids, making the line thicker as you get to the outer corner of your eye, and thinner as you go towards the inner eye. I used Bare Escentuals Buxom Lashliner which also has the added effect of conditioning and thickening your lashes over time. I also lined my lower waterline with a light beige eyeliner (you can also use white) which makes your eyes look awake, refreshed, and huge. I used Stila Kajal Eye Liner
in Topaz.

Bare Escentuals Buxom Lashliner in Leatherette

Stila Kajal pencil in Topaz to my waterline

After applying eyeliner
Step 9: Curl your lashes and apply your favorite mascara to finish your eyes. For this particular look, I used L’Oreal Telescopic For Lashes, Black 905 .27 fl oz (8 ml) which give your lashes a mile-long look.

L'oreal Telescopic Explosion Mascara in Black
Step 10: Line your lips with a nude lip-liner, and fill them in with it, to prevent lipstick smudging and to make your lipstick last longer. I used Eyes Lips Face lipliner in Bark. Don’t worry if you have foundation on your lips since we are doing a nude lip.

E.l.f lipliner in Bark
Step 11: Apply a nude lipstick all over your lips. I used Maybelline Volume XL Seduction Plumping Lipcolor .11 oz (3.2 g) in “In The Nude.” Then, apply a sheer, sparkly lip gloss to the center of your lips only. This will not only give a gorgeous glow, but make your lips appear fuller. I used Milani 3D Glitzy Gloss in “Designer Label.”

Maybelline lipstick, "In The Nude"

Milani 3D Glitzy Gloss in "Designer Label"

Finished nude lip
Here are some photographs of the entire natural-glam makeup look:


Beauty Gala would love to hear from you! If you would like to suggest a look, submit a look or photograph that you would like to see featured here, please use the contact form above. We welcome requests always.
It looks so pretty! Looking forward to trying this look out very soon. One reason I shy away from make up is because I just never learned correct application or colors. Your tutorial layout is just what I’ve needed! Thank you!
I love it! I tend to wear a little more makeup than Mandy but I find myself sticking to one or two palettes! I definitely need to try this look. thanks!
Thank you so much for the comments Mandy, and Rosie!
What other looks would you be interested in trying out, Mandy?
Rosie, what palettes do you currently use the most and love?
LOVE this look and definitely plan on giving it a try very soon. I think you made me want the CS C&B palette even more than I did before. I need to order it tomorrow! Keep up the great work. <3
Hey Becca, I was curious if you have had any issues with the L’oreal Studio Secrets Magic Perfecting Base.. I know all skin types are different, but after use I have found myself breaking out.. Which I don’t generally have an issue with. As a primer, it definitely works well -minus that issue. Just curious!
🙂
Hi Cassie! I actually did break out a couple of weeks after starting to use this product…not a terrible breakout, but I noticed some small pimples where I was mostly applying it (my t-zone). Since I have stopped using it, my skin has been fine.
This product is labeled as non-comedogenic and oil-free, so I was baffled as to why it would break me out. I do know that primers with silicone in them (Smashbox Photo Finish) really tend to clog my pores and cause breakouts, but the L’oreal website simply says that it contains “polymers” that smooth skin. Either way, this product has a very similar feel on the skin as Smashbox Photo Finish does (that smooth, almost slippery feeling), and so I am wondering if there is a connection.
When you stopped using the product, did your skin clear up? If it did, then the primer is the prime suspect. I would stick with your regular moisturizer as a makeup base, or to be sure, non-slippery feeling primers. I typically use that as a gauge as to whether or not my skin will break out from a primer: If it has that slippery smooth feeling, there is probably something in it that will clog my pores.
If you have any other questions don’t hesitate to ask!
Thank you so much for that! I feel at ease now 😉
I hadn’t discontinued use yet because I wanted to see if you had had the same issues with the product, but now that I know you did I will no longer be using it! I had initially chalked it up to stress, but that’s not it because it has continued to be an issue. So, thank you so much for that helpful hint!
I also wanted to check and see if you had continuied the use of your L’orel 360 face wash and if so how you were liking it since it’s been a few weeks.
Thanks! 😀